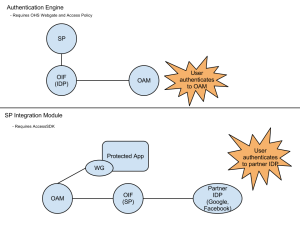
When ever I need to integrate Oracle Identity Federation (OIF) and Oracle Access Manager (OAM) it always takes me a few minutes to remember which integration approach provides which capability. I decide to make myself a cheat sheet to help remember. If you are ever in the same boat hopefully this will help.
Month: February 2012
Implementing #OpenID with Oracle Identity Federation #Identity #OIF
I have a customer that is an Oracle Identity Management shop. They are looking to leverage OpenID to increase the ease of collaborating with internal and external partners as well as to reduce the cost of managing passwords for non-employees. They are also implementing other strategies to reduce the use of passwords in their environment, but for today I just want to talk about how to implement OpenID.
A good starting point is Warren Strange’s (Strange Brew) “Adding an OpenID Relying Party to Oracle Identity Federation (OIF)”. In this post Warren describes, in perfect detail, how to integrate OIF with Google as your Identity Provider. As Warren points out, OIF includes a test service provider integration module that you can use to validate that you have things configured correctly. You will have to change to use another Service Provider Integration Module (OSSO, OAM or Custom) to actually leverage this in production; otherwise the user will always end up on the test results page regardless of where they were attempting to get to.
The other side to the coin is adding an OpenID Identity Provider to Oracle Identity Federation. In my customer’s use case they have internal organizations that would like to consume identity information, from my customer, but they still want to remain loosely coupled. Their choice here would be to go with SAML or OpenID. They will be supporting both options.
First, make sure that you are on at least OIF 11.1.1.4.
To enable OIF as an OpenID IdP you need to log into Enterprise Manager and go to Oracle Identity Federation >> Administration >> Identity Provider. Make sure that the Identity Provider is enabled in the Common tab, Apply (if not already enabled) and then switch to the OpenID 2.0 tab. From this tab, make sure to check Enable OpenID 2.0 Protocol then at the bottom of the screen click on the box that says Create, which is next to “Generic OpenID Service Provider”. This provides configuration for service providers that are not specifically named in the Federation. Click Apply.
Next, go to Oracle Identity Federation >> Administration >> Federations. You should see to Trusted Providers already listed. The first will have a Provider-ID of “Unknown-OpenID-RP”, which was created when you created the generic provider in the step before. The second, which will be there if you followed the steps in Warren’s blog, will have a Provider-ID of “Google” (or something like that). You will need to add a provider for your IDP. Click on “Add” and the “Add Trusted Provider” screen will open. Click the radio button next to “Add Provider Manually”. Let’s assume that we are implementing this for a company called Acme, Inc.
Complete the information as shown below, and then click “OK”.
Next, highlight the Provider you just created and click on “Edit”.
In the Trusted Provider Settings tab add the Endpoint URL and the Discovery URL:
Endpoint URL: http://fed.acme.com:7777/fed/idp
Discover URL: http://fed/acme.com:7777/fed/idp
Then, click on the Oracle Identity Federation Settings tab.
To enable a setting you have to click on the little square in the circle until it turns blue and then check the box at the end of the line. You want to enable both Map User via Federated Identity and Error when User Mapping fails. Your screen should then look like this:
Click Apply.
Optionally, you can enable the Attribute Exchange by clicking “Edit” next to Attribute Mappings and Filters.
The last thing you need to confirm that your Identity Provider has a user identity store that it will authenticate against. You can do this by clicking on Oracle Identity Federation >> Administration >> Authentication Engines. The Default Authentication Engine will be set for whatever you selected during install. The default is JAAS. I changed mine to LDAP Directory. Then click on the LDAP Directory tab. Click Enable Authentication Engine and complete the requested information. Make sure you test the LDAP connection before applying.
At this point you can test using the same steps that Warren outlined in his blog post:
Go to: http://fed.acme.com:7777/fed/user/testspsso
Select ACME from the IdP Provider ID drop-down box.
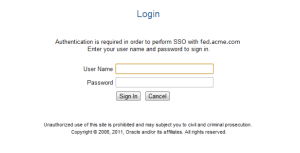
Then click on Start SSO. You should be prompted by OIF’s default IDP to authenticate
and then after successfully authenticating you will have to Accept on a User Consent page and
then you will be returned to status page showing you a successful authentication.
So, those are the basic steps. There are a number of use cases that would require additional configuration. For Federal agencies implementing this for a FICAM solution you would need to look at enabling the Provider Authentication Policy Extension (PAPE) 1.0 options on the Identity Provider configuration page.
About TUMY | Technology, Inc.
TUMY | technology, inc. (TTi) provides Identity & Access Management (IAM) solutions that secure and manage digital identities and applications.
In response to growing security threats and regulatory compliance mandates (HIPAA, Sarbanes-Oxley, etc.) organizations need solutions that can be implemented quickly to identify users and their entitlements before giving access to requested resources. We specialize in vendor solutions such as ForgeRock and Oracle. Our mission is to deliver secure, robust and cost-effective solutions to our clients. Please contact us at: info “at” tumy-tech.com or 1.240.215.4825


